:(

Not found.

Retain leading zero in CSV

Leading Zeros in Excel with CSV

Most web applications at some point will have some sort of an export data feature to get data out of the database in some csv or excel format. CSV is probably the simplest to generate on the fly from PHP and other server side scripting languages. However, I had a particular issue where leading zeros were just not displaying when the csv file was opened with Excel. Look at the example csv below where when opened in Excel will not show leading zeros.

"Comment","Number","Zip"
"Leading Zeros will not be displayed","0003833","0596"

The best solution to work around this is just to add an = in front of the column to avoid Excel from formatting the column when displaying numeric value. So below works fine.

"Comment","Number","Zip"
"Leading Zeros shown in Excel",="0003833",="0596"

Hope this simple trick helps you avoid Excel eating up leading zeros in csv! Any other CSV related suggestions and comments are welcome.

Tracking user engagement on Facebook fan pages

In our previous blog post we showed how to setup Google Analytics for Facebook fan pages. The article was very well received and highlighted the importance of improved analytics. Please review the older article for detailed instructions on how to setup Google Analytics. Here are a few interesting concepts which will help you build better Facebook fan pages and also take your Analytics information one step further:

Fans versus Non Fan activity

An interesting way to look at your Facebook fan page activity is to split them with activity by your Fans and non fans. To do this, we need to use segments in Google Analytics to split activity into Fan and Non-Fan activity. You can create a segment based on pages visited by your user or specific event.

fans-vs-non-fans2

Using segments to track Fan/Non Fan activity

We will need to use FBJS (Facebook Javascript) and the tag <fb:visible-to-connection>. The tag will allow us to display a section to Fans and another to Non-Fans. We have managed to use this to create a single action button but calling different FBJS functions depending on whether the user is a fan of the page or not. Once a Javascript function is activated, the appropriate tracking image has to be shown to log the visit correctly on Google Analytics. Displaying this tracking image causes a hit to be registered on Google Analytics and this can be used to segment traffic. Visit our tracking page to get the code and see this in action.

Tracking activity on forms and on your pages

This is a good method to track user engagement with the Facebook page. Several users might visit your Facebook page but only a few might actually engage with the form. When your custom Facebook fan page loads, Facebook does not activate the Javascript you have written. This is only activated when a user performs an activity. Something like clicking on a button, clicking of your form, playing a video, entering some details onto the form, clicking on a button of your carousel, etc. This is a good opportunity to track activity on your page. All you have to do is use a script tag like the one used in the Advanced tracking page.

Goal and Funnel Visualisation

This can be a quite powerful tool, you can track for example how many users visit your contact page, how many then proceed to engage with the page and how many eventually click on the contact button. Here is an example of a funnel visualisation.

A simple funnel visualisation

A simple two step funnel visualisation

The above two step funnel visualisation shows you how many users visited our contact page and how many proceeded to submit the form. This could have also been made into a three step funnel displaying how many visited the contact page, how many clicked around and how many actually clicked the contact button.

Tracking Purchases or clicks on your fan page

To track clicks which can be purchases, clicks on links, etc. We generate a tracking code for each action that we want to track using our trusted Google Analytics code generator. We then load this image location on click of a button, or link, etc using the usual onclick event handler.

In conclusion

These techniques require some knowledge of Javascript and a reasonable understanding of how the image technique lets you work around Facebook’s Javascript restriction. You can get the complete source code to how we segregate fan and non fan visits, etc here. We are a web development company and will be happy to help you out with your unique tracking needs on your Facebook page. Please share your thoughts, comments and ideas on how to track user behaviour in more depth.

Google Analytics for Facebook Fan Pages

We launched our Facebook fan page earlier this month and as with all Facebook pages only Facebook Insights program is available to page administrators. Facebook Insights shows demographic details and interactions on your pages BUT limited to show information of fans only. It is far less sophisticated and comprehensive when compared to the free Google Analytics. One of the limitations of Facebook Fan pages is that you can only run limited Javascript on it and Google Analytics needs Javascript code included to correctly track visitors. We have successfully managed to get ALL functions of Google Analytics working on our Facebook fan page (including visitor statistics, traffic sources, visitor country, keyword searches with all other powerful reporting & maps overlays etc).

Google Analytics Example

How to setup Google Analytics on your Facebook fan pages

The workaround we use in our code is to include Google Analytics as an image instead of setting the standard Javascript. This method tracks every visitor to the custom facebook pages on Google Analytics. It required a combination of server side cookie management and an additional <img> tag to the bottom of the facebook fan page. Here are the steps to get Google Analytics working on your facebook fan page.

1) Setup Google Analytics account. If you already have one, create a new website profile. You can name it facebook.com or facebook.com/your_page_name. You will finally get your tracking code which looks like this UA-3123123-2
2) Create your custom img tag for each of your pages you like to track. EG: contact form, services, products etc. You can use our tool to create the Google Analytics link generator for Facebook pages.
3) Add the entire custom image html tag from step 2 to the bottom of each Facebook fan page that you need to track.

That is all there is to it! Google Analytics is not real-time, so you will need to give it some time. Approximately a day before you see the fruits of your “hard” work.

For advanced users

Use this method, if you don’t want to use our hosted link redirection as mentioned in the method above. You can download the entire source code which is just about three files to get this setup working on your own server (running PHP4.3 or above). The code is written in PHP and essentially creates the Google image tracking URL with the referrer, page information, ID, etc. The additional advantage of hosting this on your own server and domain is that visits from your website to your facebook fan page gets tracked, etc. You will also be able to customise further if you wish. Please do share any useful updates you apply to the tracking link code.

Facebook – Google Analytics Tracker v1.1 (Updated 21st Feb, 2010).  For advanced method – Download this code to use on your server.

If you don’t have a Facebook fan page yet, visit our tutorial for code and help on creating customised Facebook fan pages.

PS: We could not find any other source / blog that described how to get Google Analytics on Facebook fan pages! There is support for canvas pages and applications but nothing for StaticFBML fan pages. Hope this helps and please leave your comments below.

UPDATE:
1) A lot of users have asked how to track visits to the wall. Yes, this can be done. Please see the comments by iphp below.
2) Here is a screenshot to a staticFBML where the code should be placed
3) We have managed to set up funnels, goals and segments to separate fan and non fan activity.
4) Video: Here is a link to the Webdigi youtube channel check our favourites to get step by step walkthrough!
5) This blog and comments cover all aspects of setting up Google Analytics. If you still want help, we are available to offer paid support and installation of Analytics for your page. Please contact us here.

Creating a custom facebook fan page

A Facebook Page is a public Profile that enables information about business and products to be shared with Facebook users and the public. An user should be able to create one in a few minutes. This article explains how to add custom tabs to your Facebook page to make it do more. Here we explain how we built a carousel, navigation tabs, forms, etc on the Webdigi Facebook fan page.

Nutella Facebook fan page

What do you need to create custom Facebook fan pages?

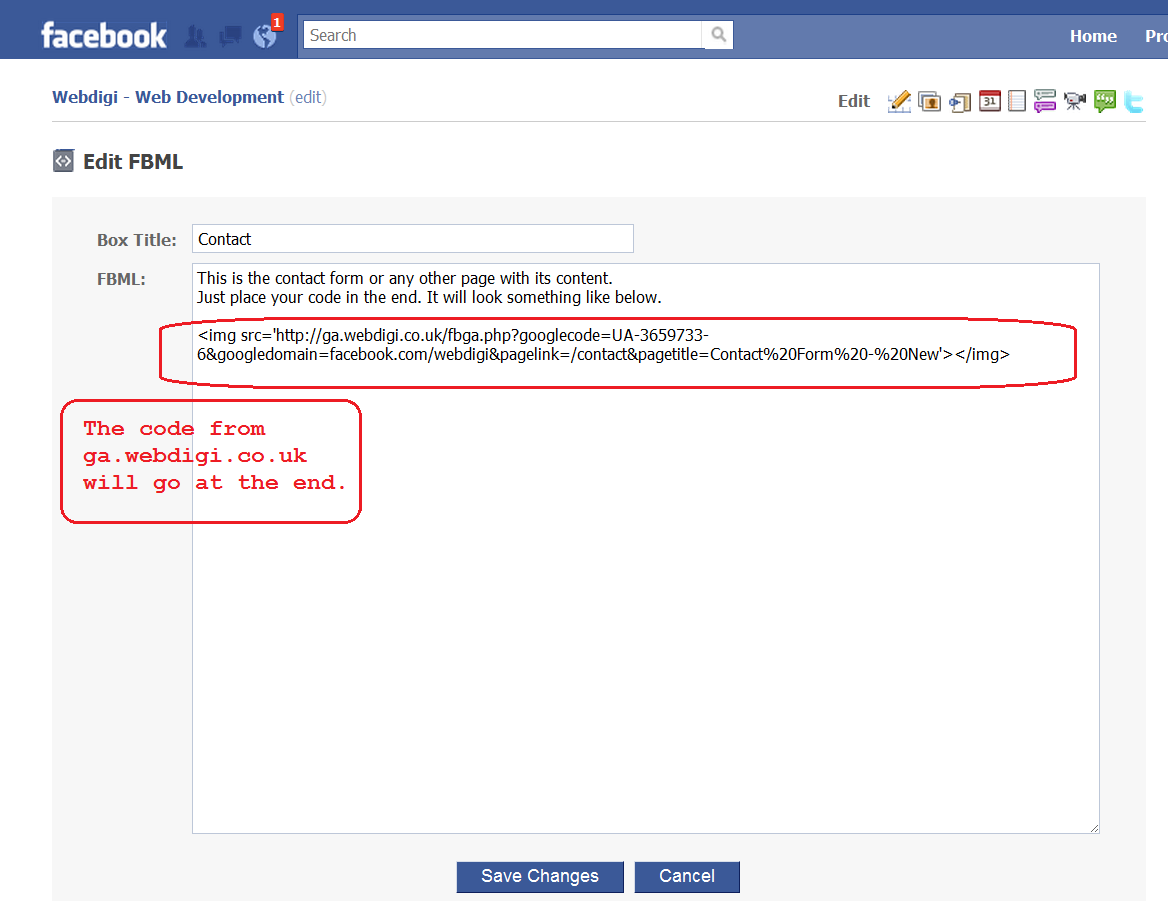
The only thing you need is Static FBML created by Facebook, this is an application that you have to add to your page. You can add advanced functionality to your fan page using the Facebook Static FBML application. This application will add a tab to your Page in which you can render HTML or FBML (Facebook Markup Language) for enhanced Page customisation. You will be able to add more than one tab using this application. On our Facebook fan page, we have three pages created using this application: services, portfolio and contact.

What are the restrictions on Facebook ?

1) Facebook does not allow Javascript to run on load, an user action like a mouse click must be performed before Javascript can be run. You will notice this on the services tab of our Facebook fan page. The carousel mouse over works only after you click on one of the arrows.

2) You will need to use FBJS (Facebook Javascript). This provides the functionality we need to develop custom facebook pages. This is also to protect other users privacy at the same time and restrict Javascript features that can be abused.

3) Use <link href=”http://example.com/style.css” rel=”stylesheet” type=”text/css” /> if you want to use CSS on your Facebook fan page. This is to get the page to work correctly on Internet Explorer. The other browsers support the <style type=”text/css”> tag.

4) AJAX requests have a short timeout and these requests are proxied via Facebook. There are also limits on length of JSON replies, etc.

Creating tabs on the Facebook fan page using FBML and FBJS

FBJS is Facebook’s solution for developers who want to use JavaScript in their Facebook applications. FBJS DOM objects implement most of the same methods regular JavaScript objects implement including: appendChild, insertBefore, removeChild, and cloneNode. Properties like parentNode, nextSibling, src, href (and many many others) have been redefined as a couplet of getters and setters (getStyle : setStyle, getValue : setValue, getClassName : setClassName). Here is an example of a tab on a Facebook page.

apptabs

Creating a carousel on the fan page

FBJS exposes a powerful animation library which gives developers an easy way to improve their user interface with a line of code or two. All animations are CSS based, so a working knowledge of CSS will really help you out here. One of Facebook’s security restrictions are that Javascript will not be allowed onload of the page. The user must perform an action like clicking on a button, etc to begin Javascript code execution. This would mean that automated carousels; a carousel that starts rolling images by itself cannot be built into a Facebook fan page. This restriction also applies to pages with video, etc.

portfolio

Submitting a web form using AJAX

Creating a form for a fan page can be done using HTML. The AJAX support from facebook is interesting. All AJAX requests to the server you have under your control goes through facebook. If you have a tool monitoring the AJAX request, you will see that the form is actually being sent through to fbjs_ajax_proxy.php which in turn POST or GET the request to your server. The AJAX request can be sent using FBML in 3 steps:

var ajax = new Ajax();
ajax.responseType = Ajax.FBML;
ajax.post('http://example.com/ajax.php');

Creating Dialog boxes on Facebook

dialog

FBJS offers a variety of Dialog boxes: Confirmation boxes, Yes/No type, Dialog boxes with forms, Choice, etc. To create the above dialog, we just need the following one line of code

new Dialog().showMessage('Confirmation', 'The contact form has been submitted.');

Show me the code

Here are all the three code files that are in use for each of the three tabs on Facebook.

Contact Us tab (Containing form, AJAX submit and Dialog boxes) code

Portfolio tab (Carousel using FBJS Animation features) code

Services tab (Tabs within page, basic FBJS events) code

We hope this helps you cut short your search and gives you a head start in your quest to build custom tabs within Facebook pages. There are numerous resources out there that helped us understand FBJS and build this article. Do send us links to fan pages that you have built, looking forward to your comments.

Stupidity versus Malice

As a web developer, I am required to build web applications and secure websites. One of the key requirement is to create a secure and well protected system to keep attackers at bay. Although securing the website from malice is important, it is also important to secure the web application from stupidity. Stupidity from the privileged users, administrators, developers, etc. The cost of stupidity is often underestimated. By stupidity I mean lack of average intelligence assumed for a particular task or not thinking through atleast a few worst case scenarios prior to doing something.

Let me give you a few big examples from history and recent times.

1) Data worth 2 billion dollars lost in courier
In 2007, 25 million child benefit records was sent from one government department to another and was lost by the courier company. The discs were sent by a junior staff member unencrypted and unregistered. The discs contained all kinds of personal data, names and ages of children, bank savings account numbers, partners details and even National Insurance Numbers (Equivalent to the Social Security Numbers).  The costs that this caused UK is not clear but it did involve high profile resignations, weeks and weeks of political debates, banks monitoring millions of accounts for fraudulent activity, etc. Some estimate the data alone could be worth over $2 billion in criminal hands.

2) The Honda Point Disaster (Off California Coast)

Aerial view showing all seven destroyers

Aerial view showing all seven destroyers

This was the largest peacetime loss of U.S. Navy ships in which seven destroyers were lost. This tragedy was not caused by malice. Twenty-three sailors died in the mishap. Two other destroyers were slightly damaged. The navy court ruled it as a fault of the navigators and the captains of each ship. How did this happen? The flagship was equipped with a radio navigational receiver, but ignored the bearings, believing them to be erroneous. No effort was made to take soundings or depth measurements. These operations were not performed due to the need to slow the ships to take readings. The ships were performing an exercise that simulated wartime conditions, hence the decision not to slow down. In this case, the dead reckoning (method of estimating position) was wrong and the mistake fatal. The need to slow the ship might also reminds us of another disaster, the Titanic!

3) Aviation Accidents
Boeing studied commercial jet accidents (not including hijacking, test flights, etc) between 1959 to 2008. They determined the primary cause of Airline hull loss accidents (aircraft beyond repair) to be the following:

  • 55%: Flight crew error
  • 17%: Airplane
  • 13%: Weather
  • 7%: Misc./Other
  • 5%: Air traffic control
  • 3%: Maintenance
  • Clearly a lot of these are preventable and a lot of lives could have been saved. Flight crew error and the Air traffic control accounts to about 60% of all hull loss accidents.

    In Conclusion
    Accidents do and will happen, I would recommend developers to think about stupidity and not just malice when building systems. I have two interesting quotes to leave you with.
    Albert Einstein – Two things are infinite: the universe and human stupidity; and I’m not sure about the universe.
    Hanlon’s Razor – Never attribute to malice that which can be adequately explained by stupidity.

    Do share incidents that you have come across during your career.

    How to get your side project launched

    There are many people who have a lot of interesting ideas in mind but never get around to starting on their side/pet project. Some people start on their side project but never get to completion. These are the three steps which if followed before you start actual work on your project will help you get your pet project launched.

    1. Think things through
    – This is the most important step. If you do this well, consider your side project well begun and half done!
    – Visualize things after completion will it make you happy? Will it make you feel like you accomplished something? Will it make you feel successful?
    – Humans operate with pain-pleasure principle.  Will the completion of the project alleviate your pain or others pain? Will it bring some pleasure to the work and lives of others or yourself?
    – When the going gets tough with your pet project as it often does, these reasons will help you and give you the strength to complete the project.

    2. Set a deadline with detailed plans
    – Start by identifying all the steps you need to complete and each stage.
    – When can you reasonably finish the project?
    – When do you want to launch? When do you want to get your product or service out to the public?
    – Make detailed and specific plans, not vague ones.
    – Also the most important rule, remember nothing is perfect. You will have to refine after launch and constantly learn from it. Take a look at the first version of Google. Your first launch is the beginning get ready to quickly make changes depending on user feedback.

    3. Make commitments
    – Tell your friends and your family you are going to launch on the deadline.
    – If you had prospective customers enquiring about product, let them know that you are launching the product or service on the launch date.
    – Schedule banner ads, ppc ads, book presentations, print leaflets, etc as required to promote your project and get you to focus on the launch.
    – Get a mailing list of all people who you know that will be interested in the project.
    – The third point in my opinion is the one most often ignored and causes deadlines to slip. If  your family & friends know that we are busy working on something they might understand not to bother you until your launch date!

    The first point on thinking things through will energize you or show you that this project should never be done. The third point will commit you to the deadline and hopefully clear out distractions as your family and friends are now aware of what you are working on. Only once all the three steps above are complete you should start working on your project and in accordance with your plan.

    If you are working on your pet project please do share your experience!

    Get your own cloud server running in 15 minutes

    This article uses Amazon EC2 and does not require any additional software installed on your machine to get your own cloud instance running other than your browser. To further configure your instance once it is running you will need Putty or an RDP client depending on your server instance.

    Amazon EC2 (Elastic Compute Cloud) is a service by Amazon which lets anyone create, launch, and terminate server instances as needed, paying by the hour for active servers, hence the term “elastic”. The service starts as low as 0.11$ per hour. For this article an instance of LAMP server and a Windows Server 2003 was launched and cost about $0.25. This is very cheap for your on-demand server needs.

    Steps to Launch your server instance

    1) Signup for Amazon EC2 here (If you already have an amazon account you can save 2 minutes!)
    2) Login to the EC2 management console

    AWS Management Console

    AWS Management Console (Click to enlarge)

    3) On the management console, Click on Launch Instances
    4) Select an AMI (Amazon Machine Image). You will get a huge list ranging from windows servers to LAMP servers, Ruby on Rails server, Ubuntu, Debian, Open Solaris etc. If you also look at the community supplied options you will have nearly 3000 AMIs.

    List of Amazon Machine Images

    List of Amazon Machine Images

    5) Create a key pair by following on screen instructions. This is to help you to login to your AMI once it is ready.
    7) Configure firewall settings and limit access to the server (SSH, MySQL, Web, etc).

    Authorise connection method

    Authorise connection method

    8 ) You will now arrive at the final step of your wizard. Enter number of instances. Select an instance type Small, High CPU, etc. You will also have to select the key pair that was generated for you at Step 5. Click Launch once set.

    Set Number of Instances

    Set Number of Instances

    9) Voila! your instance will be available in just a few minutes. Now you can pat yourselves on the back for all the hard work!

    It is amazing how quickly you can get an instance running. Once your server is up and running how do you connect to this instance? Well, it is pretty simple if you are using windows you get to use RDP (Terminal Services). For non-windows instances you will have to use SSH to connect to the server.

    Advanced configuration of your Windows instance using RDP (optional)

    It is easy to connect to a windows amazon instance via RDP compared to SSH connection to a linux server. To retrieve the RDP password, you will have to right click your instance and retrieve connection information using the key pair you have been given.

    Connecting via RDP

    Connecting via RDP

    You will have to connect using Administrator as your username. You will find all other info you need on the management console.

    Advanced configuration of your Linux instance using SSH (optional)

    You will need putty to connect to your linux server via SSH on a windows machine. If you are on a linux machine you will be able to use the ssh command as shown on the management console. With putty you will also need an additional tool to create a PPK file from the PEM file that you are given from the management console. To do this you will have to download an additional tool called PuttyGen.exe. You have to load the PPK file under the SSH Auth section of the putty client.

    SSH Connection to your instance

    SSH Connection to your instance

    Once your instance is up and running you will be able to connect to the webserver, connect to the MySQL server, if it is enabled with the AMI. The last two sections are to help you further configure your instance further. There are so many AMIs available with a lot of features already built in. Technically you will have your services running after the first set of steps which can be complete in 15 minutes!

    If you do not want to configure a server yourself take a look at the Windows Azure, Force.com or the Google App Engine which runs Java, Python and PHP using Quercus for free (certain usage limits apply).

    Rise of Javascript

    Since its birth in 1994, Javascript has come a long way. Today it is one of the most popular programming languages on the web. Javascript has been on the rise and is growing faster since AJAX based applications reignited professional developer interest. It is now possible to it to write applications on the server, the mobile devices, on the browsers (add ons and plugins),  inside PDF documents, even in some remote controls and many more to come.

    Javascript application development in Mobile devices

    Build Native Applications using Javascript

    Build Native Applications using Javascript

    Palm’s new OS is the first mobile platform to be built from the ground up to combine standard technology, innovation and integration. At its core, webOS leverages several industry-standard technologies, including web technologies such as CSS, XHTML and JavaScript. You can think of webOS applications as native applications, but built from the same standard HTML, CSS and JavaScript that you’d use to develop web applications. Palm has extended the standard web development environment through a JavaScript framework that gives standardized UI widgets, and access to selected device hardware and services.

    Javascript can be used on the iphone too.  The HTML 5 specification provides a new mechanism for client-side data storage: JavaScript database support. This feature shipped originally with iPhone OS 2.1. When you use “Add to Home Screen” from the “+” button on Safari for iPhone, a web application with a manifest defined (per the HTML5 spec) will be saved with any cached resources.  It is also worth noting that these features have not been added to Safari on Mac OS X or Windows.

    Desktop Application development using Javascript

    Adobe AIR is a cross-platform desktop runtime created by Adobe that allows web developers to use web technologies to build and deploy Rich Internet Applications (RIAs) and web applications to the desktop. This means what you can write you application using Javascript and then let AIR to figure out how to run your code in Windows, Linux, Mac and future operating systems.

    airtotal2

    Desktop App using Javascript

    The application shown in the pic is written using Javascript, HTML and CSS. It uses the ExtJS library. Javascript can be used to dock the application in the taskbar, delete and modify files on the hard drive, communicate to different server, use AJAX, etc. You can even use flash within your app to make the application look and feel much better. This gives the web developer good access to a desktop.

    Server side Scripts using Javascript

    Server side JavaScript has been around for a long time and potentially offers some unique and interesting advantages over other languages (like PHP, ASP, etc) because the same language is spoken by both client and server. There are numerous attempts to bring server side javascript to the masses.  Server side Javascript has to do much more than what it has to do at the browser level with access to databases, files, and networking, as well as logging, process management, scalability, security, integration APIs, and extensibility. You can even use your own javascript libraries on the server jQuery, dojo, Ext JS, prototype, etc.

    Javascript in other places

    – Adobe reader (from v3.02) supports Javascript for forms and basic operations. SOAP support has also been included since version 7.0. There is also access to the entire 3D Javascript API. More details on using Javascript is available here
    – Open office application suite supports Javascript to write macros. This move looks like a sensible addon given the usage of VBScript in MS Office suite.
    – Apple’s Dashboard Widgets, Microsoft’s Gadgets, Yahoo! Widgets, Google Desktop Gadgets are implemented using JavaScript.
    – The oddest one in this list will have to be the  Philips Remote Control which uses Javascript

    ECMAScript 4 (ECMAScript Harmony)

    Javascript has been relatively stable since the third edition of ECMAScript published in 1999. Features under discussion for a future edition originally ECMAScript 4 now ECMAScript Harmony include Classes, a module system, static typing and Optional type annotations, Generators, Iterators, Destructuring assignment, algebraic data types. Well if you think this is ambitious you should see the original ECMAScript 4 which had more semantic and syntactic innovation. Packages, namespaces and early binding from ECMAScript 4 are no longer included for planned releases with ECMAScript Harmony. The intent of these features is partly to better support “programming in the large”, and to let programmers sacrifice some of the script’s ability to be dynamic for performance.

    So yes as a web developer who uses Javascript on a daily basis, I am excited to watch Javascript grow and be available in more places.

    Javascript Gotchas listed to help avoid mistakes

    A gotcha in programming is something unexpected although a documented feature of a computer system and not a bug. These gotchas throw beginners off Javascript programming and send some people running and screaming. In my opinion, Javascript is one of the most widespread languages as it is available on all browsers but one of the least learned languages.  Let’s start with basic ones.

    1. Floating point arithmetic

    This can be a major cause of frustration for people who are new to Javascript and are trying to perform some kind of mathematical computation.

    <br /><br />
    <script><br /><br />
    alert(0.02 / 0.1);  //0.19999999999999998 <br /><br />
    alert(1.14 * 100);  //113.99999999999999    ;)<br /><br />
    </script><br /><br />
    

    This is where the Math.round() functions come in handy

    2. Plus operator overloading 

    The plus operator stands for both arithmetic operations and also string concatenation. This is convenient if used correctly. Lets take a look

    <br /><br />
    <script><br /><br />
    var msg, one="1";<br /><br />
    msg = 2 + "1"; // msg = "21"<br /><br />
    msg = 2 + one; // msg = "21"<br /><br />
    msg = 1 + 1 + 1 + " musketeers"; // msg = "3 musketeers"<br /><br />
    msg = "Bond " + 0 + 0 + 7; //msg = "Bond 007"  <br /><br />
    </script><br /><br />


    The above behaviour is because the operations are performed left to right. If we use parantheses the behaviour will change based on the order of the string or number in it.

    3. Semicolon insertion at line feed

    Javascript automatically inserts ; at a line feed. Lets see this in action with a simple example:

    <br /><br />
    <script><br /><br />
    function returnSame(a){<br /><br />
       return                 //Inserts semi-colon to convert to return;<br /><br />
       a                      //a becomes a; - Unreachable<br /><br />
    }<br /><br />
    alert(returnSame(2));  //Output is undefined<br /><br />
    </script><br /><br />
    

    The magical semicolon insertion can get things complicated while creating objects using object literals

    4. typeof operator

    typeof is a unary operator. The results are not one would normally expect. It suprisingly evaluates null to “object”. 

    <br /><br />
    <script><br /><br />
    var obj={};  //object created using object literal<br /><br />
    var arr=[];  //array created by array literal<br /><br />
    alert(typeof(obj));   //object  - Good<br /><br />
    alert(typeof(arr));   //object  - Bad<br /><br />
    alert(typeof(null));  //object  - Ugly!  ;)<br /><br />
    </script><br /><br />


    It should only be used to distingush objects from other primitive types.

    5. false, null, undefined, NaN, Infinity

    They stand for different things although they might look similar or at times look redundant. Javascript uses three primitive datatypes numbers, strings and boolean. In addition it has two trivial datatypes undefined and null. Both null and undefined are equal according to the equality operator (==)

     <br /><br />
    <script><br /><br />
    var a;<br /><br />
    alert (a);    //undefined<br /><br />
    alert (1/0);  //Infinity<br /><br />
    alert (0/0);  //NaN<br /><br />
    0/0 == 0/0;   //false - a NaN != NaN<br /><br />
    alert (b);    //error<br /><br />
    </script><br /><br />


    6. String replace only replaces first occurence

    Unlike PHP or other languages, string replace in Javascript only replaces the first occurence of a string by default.

    <br /><br />
    <script><br /><br />
    var nospace = "I dont need spaces".replace(" ","_");<br /><br />
    alert(nospace);    //I_dont need spaces   - Only first occurence<br /><br />
    var nospace = "I dont need spaces".replace(/ /g,"_");<br /><br />
    alert(nospace);    //I_dont_need_spaces<br /><br />
    </script><br /><br />


    7. ParseInt function

    This is used to convert a string into an integer. The function does accept two arguments and the second argument specifies the radix. The radix here for decimal is10. If no radix argument is passed the parseInt function tries to guess the base and in this case because the string starts with 0, it is parsed as an octal number.

    <br /><br />
    <script><br /><br />
    var str = "017";<br /><br />
    var strInt = parseInt(str);      //strInt = 15  ;)<br /><br />
    var strInt = parseInt(str,10);   //strInt = 17<br /><br />
    </script><br /><br />
    

    Please share your Javascript Gotcha’s using the form below:
    (note use &lt; and &gt; 
    to get past the comment filter for < and >)


    Understanding FTP using raw FTP commands and telnet

    Both FTP and SMTP are simple text based protocols. A previous article showed how to check if an email address exists using SMTP commands from the terminal. Here I would like to show you how you can use raw FTP commands to connect to an FTP server, login, traverse directories and even download files. But before we do this we need to understand how FTP is different from the other protocols. 

    Firstly FTP (File Transfer Protocol) uses two channels, the data channel and the control channel.  This is called out-of-band control. The control channel sends commands to the FTP server and the data channel is used for data (to retrieve files from the server, etc).

    Secondly there are two major modes of FTP operation, the active mode and the passive modes. The difference lies in the way the data channels are opened. In Active FTP, the FTP server will connect to the client port and send data to it. In Passive FTP, the FTP server will tell the client which port to connect to for retrieving data. Firewalls can complicate the process on both sides. 

    In our example, we will use Passive FTP (avoiding firewall issues on client) to download a file using anonymous FTP login to the IETF servers. There are a lot of files on this server by some estimates it is about 4GB. We will pick up a small file called ftpext-charter.txt located in the /ietf/ftpext/ folder on the server.

    Open the terminal/command prompt (On windows, Go to Start > Run > type cmd). Once you are on the command prompt, type this command to connect to the FTP server and issue commands

    C:\> telnet ftp.ietf.org 21

    220 ProFTPD 1.3.1 Server (ProFTPD) [64.170.98.33]
    USER anonymous
    331 Anonymous login ok, send complete email address as your password
    PASS blogger@webdigi.co.uk
    230 Anonymous access granted, restrictions apply
    CWD ietf/ftpext/
    250 CWD command successful
    PASV
    227 Entering Passive Mode (64,170,98,33,151,31).
    RETR ftpext-charter.txt
    150 Opening ASCII mode data connection for ftpext-charter.txt (6060 bytes)
    226 Transfer complete
    QUIT
    221 Goodbye. 
    

                                         Commands/Response on control channel

    We issued these five commands in the following order at lines 2, 4, 6, 8, 10 and 13
    USER – Send username to the FTP server
    PASS  – Send the password (Anonymous servers need email address)
    CWD  – Change the working directory on the server
    PASV – To enter the passive mode (To let client connect to the server)
    RETR – To retrieve a remote file from the server
    QUIT – To terminate the connection to the server 

    Between line 10 and 12, you will notice that the file was downloaded. To start the download, I had to open up another telnet window to open the data channel. To figure out to which IP address and port I had to connect to, we have to look at line number 9. We received a set of numbers (64,170,98,33,151,31) from the server in response to the PASV command. The first four related to the IP address 64.170.98.33 and the last two 151 and 31 help us identify which port to connect to.  Multiply the first by 256 and add it to the second. So, 151 * 256 + 31 which is equal to 38687.  Now that we have the IP address and port number, all we have to do is to open a second terminal and telnet to IP:Port as shown below:

    C:\> telnet 64.170.98.33 38687 

    This will now show you all the contents of the file ftpext-charter.txt being thrown into your second terminal window. Once this is done, you can proceed to type further commands on the control channel (the first terminal window).

    Notes:
    The anonymous FTP server on IETF has a 60 second timeout on its control channel connection. Please connect to your own FTP servers they might be more forgiving to humans on terminals.
    – FTP is not very secure as you can see the password and username are sent in plain text! Also, there is no encryption as you saw on file downloads or uploads.
    – Type HELP once you send your password to see what commands you can issue the server.
    – Here is a list of raw FTP commands and the parameters
    – Here is a list of anonymous FTP servers
    – This is the FTP sequence diagram which explains stuff at DNS and TCP level
    – On windows there is a built in command line FTP tool (called ftp). It is useful but it does not show us how to use raw commands and communicate to an FTP server.
    – SFTP (SSH File Transfer Protocol), FTPS (FTP over SSL) are more secure ways of using FTP.

    ftp-commands2

    The FTP HELP command via terminal

    Hope this helps!